Add Include directories

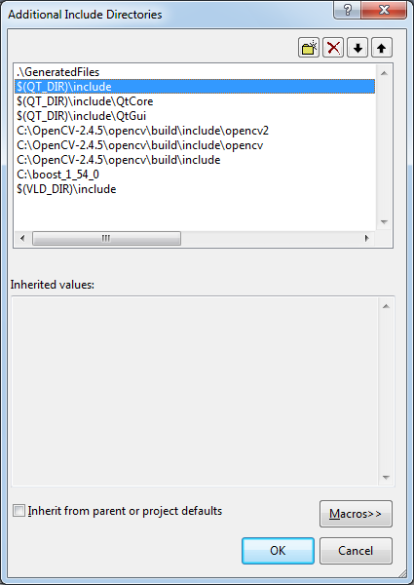
In this example, I add Include directories for Boost, Qt, OpenCV, and VLD.

Right click at project name in Solution Explorer->Configuration Properties->C/C++->General->Additional Include Directories->Edit… . Then, you have to add the following paths as shown in figure below.

Image

Include header files for Qt library
$(QT_DIR)\include
$(QT_DIR)\include\QtCore
$(QT_DIR)\include\QtGui

Include header files for OpenCV
C:\OpenCV-2.4.5\opencv\build\include\opencv2
C:\OpenCV-2.4.5\opencv\build\include\opencv
C:\OpenCV-2.4.5\opencv\build\include

Include header files for C++ Boost
C:\boost_1_54_0

Include header files for Visual Leak Detector
$(VLD_DIR)\include

A QT_DIR variable value is C:\Qt\4.8.5 and VLD_DIR variable value is C:\VisualLeakDetector.
NOTE: Your variable value may be different in your case.

Add library directories

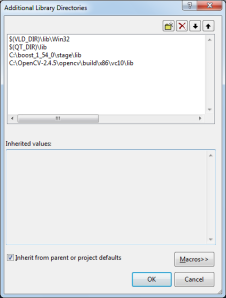
In this example, I add additional library directories for Boost, OpenCV, Qt, and VLD.

Right click at project name in Solution Explorer->Configuration Properties->Linker->General->Additional Library Directories->Edit…

Then, you have to add the following paths as shown in figure below.

AdditionalLibraryConfigurationForOpenCVAndQtAndVLDOnMSVC++

VLD library
$(VLD_DIR)\lib\Win32

Qt library
$(QT_DIR)\lib

Boost C++
C:\boost_1_54_0\stage\lib

OpenCV library
C:\OpenCV-2.4.5\opencv\build\x86\vc10\lib

The last step explains how to add additional dependencies for each library.

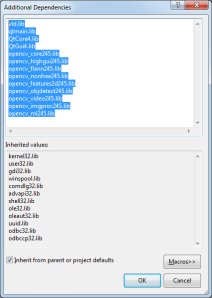
Right click at project name in Solution Explorer->Configuration Properties->Linker->Input->Additional Dependencies->Edit…. Then, you have to add .lib files that will be used in your program. In this example, I use the following libraries:

LibNameConfigurationForOpenCVAndQtAndVLDOnMSVC++

VLD library
vld.lib

Qt library
qtmain.lib
QtCore4.lib
QtGui4.lib

OpenCV library
opencv_core245.lib
opencv_highgui245.lib
opencv_flann245.lib
opencv_nonfree245.lib
opencv_features2d245.lib
opencv_objdetect245.lib
opencv_video245.lib
opencv_imgproc245.lib
opencv_ml245.lib

NOTE: This example shows a configuration in release mode. If you would like to configure your project for debug mode, dependencies name may be slightly different.

That’s all. Let’s compile and run the program. 🙂

I tried to compile my LATEX file on Ubuntu 12.04 but I got this error message 

    ptmr7t.log: No such file or directory

After searching in Google for a while, I found this page. To fix this issue, we have to install texlive-fonts-recommended package. You can install via synaptic package manager or just run a command “sudo apt-get install texlive-fonts-recommended” in terminal.

Posted by: sirivy | October 30, 2012

How to install .rpm on Ubuntu

Reference: http://www.howtogeek.com/howto/ubuntu/install-an-rpm-package-on-ubuntu-linux/

I have to install flash plugin on my Ubuntu and the file downloaded from Adobe website is in .rpm format. To intall .rpm file, I follow the instructions on the reference link as follows:

  1. sudo apt-get install alien dpkg-dev debhelper build-essential
  2. sudo alien flash-plugin-11.2.202.243-release.x86_64.rpm
  3. sudo dpkg -i flash-plugin_11.2.202.243-1_amd64.deb
Posted by: sirivy | October 23, 2012

Get a video stream from LiLin iMegapro using VLC player

1. Go to menu Media > Open Network Stream…

2. On Open Media window, select Network tab. Then, you have to put

  • rtsp://192.168.2.200:554/rtsph264480p

 in URL text box. You have to replace the IP address of your LiLin camera instead of 192.168.2.200. You may use rtsp://192.168.0.200:554/rtsph2641080p to get a video stream at 1080p. The syntax for rtsp address may be different for each brand of IP camera. For example, rtsp://192.168.2.200/now.mp4 for IQEye IP camera.

Posted by: sirivy | October 12, 2012

Could not find module FindPCL.cmake

After I install PCL and try to run a simple PCL project, I got this error message when I run “cmake”:

********************************************************************************************
CMake Error at CMakeLists.txt:6 (find_package):
Could not find module FindPCL.cmake or a configuration file for package
PCL.

Adjust CMAKE_MODULE_PATH to find FindPCL.cmake or set PCL_DIR to the
directory containing a CMake configuration file for PCL.  The file will
have one of the following names:

PCLConfig.cmake
pcl-config.cmake
— Configuring incomplete, errors occurred!

**********************************************************************************************

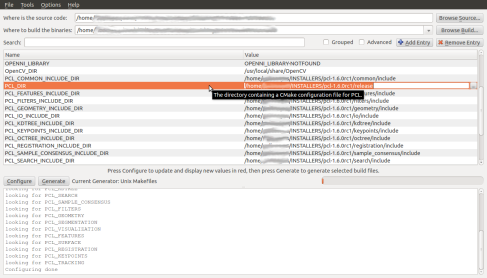
This error message occurs because we haven’t set PCL_DIR yet. I follow the suggestion in the error message for setting the PCL_DIR. To set PCL_DIR, I use cmake-gui by running a command:

  • cmake-gui .

in my project directory. You can see the figure below for setting up PCL_DIR.

Image

The PCL_DIR is the folder that stores PCLConfig.cmake. Usually this file will be stored in the directory that you store your compiled PCL library. In this case, my complied PCL library directory is at /home/myusername/INSTALLERS/pcl-1.6.0rc1/release where the PCLConfig.cmake is stored. After you set PCL_DIR, you just click “configure” and “generate”. If everything is done, close cmake-gui and go back to terminal to run “make”. Now it’s time for running our executable file

Posted by: sirivy | October 11, 2012

Just a note for PCL installation on Ubuntu 12.04

Required libraries:

  • Boost >= 1.46
  • Eigen >= 3.0
  • FLANN >=1.7.1
  • vtk >= 5.6

FLANN installation
You can install FLANN using synaptic package manager or install it manually. I install it using a synaptic package manager. The package name is libflann-dev.

VTK Installation
You can install VTK using synaptic package manager or install it manually. I install it using a synaptic package manager. The package name is libvtk-dev.

QHull installation
libqhull-dev

QT vtk installation
libvtk5-qt4-dev

USB 1.0 installation
libusb-1.0-0-dev

PCL Installation
To install PCL, I download a source files from http://pointclouds.org/downloads/. You can follow the following steps:

  1. Extract a tarball file.You will get a folder PCL-1.6.0-Source.
  2. I create a folder named “release” inside PCL-1.6.0-Source directory to store the compiled library files.
  3. Go to “release” folder and run a command
    • cmake-gui ..
  4. On a CMake-gui window, you have to click “configure” and then, if everything is OK, click “generate”.
  5. Compile source code by using
    • make
  6. Install library by using
    • sudo make install

I tried to compile PCL-1.6.0 but there are some problems with linked libraries. However, the PCL-1.6rc1 checked out from http://svn.pointclouds.org/pcl/tags/pcl-1.6.0rc1/ can be compiled successfully.

Enjoy PCL. 🙂

Posted by: sirivy | October 11, 2012

Just a note for OpenCV 2.4.2 installation on Ubuntu 12.04

I just got a new computer for my project. I have to install everything from a fresh Ubuntu. : ) Let’s start

1. Download OpenCV2.4.2 from http://opencv.org/downloads.html

2. Extract the file OpenCV-2.4.2.tar.bz2. We will get a folder OpenCV-2.4.2.

3. Move to the directory that you need. In my case, i will move it to my /home/myusername/INSTALLERS/.

NOTE: I create a folder INSTALLERS to keep the library that i download the source code and install it manually.

4. Go to your OpenCV-2.4.2 directory by using

  •  cd /home/myusername/INSTALLERS/OpenCV-2.4.2

    or

  • cd ~/INSTALLERS/OpenCV-2.4.2

    Then, I create a folder named “release” in this directory to store our compiled library which will be copied to /usr/local/lib (for the libraries) and /usr/local/include (for the header files).

    After you create a folder named “release”, you have to go to that directory by using

  • cd release

5. Inside the “release” folder, we will run cmake to configure the library and setup the libraries that we would like to use for compiling OpenCV’s source code by using

  • cmake-gui ..

    A command “cmake-gui ..” means that you’re using cmake-gui to look for the CMakeLists.txt in the /home/myusername/INSTALLERS/OpenCV-2.4.2 directory.

NOTE: If you haven’t installed cmake-qt-gui, you will get the error message like this

“The program ‘cmake-gui’ is currently not installed.  You can install it by typing:
sudo apt-get install cmake-qt-gui”

We just follow the suggestion by running “sudo apt-get install cmake-qt-gui”.

6. Install the required libraries which are as follows:

  1. ffmpeg
  2. libavcodec-dev
  3. libavformat-dev
  4. libxine2-dev
  5. libgtk-3-dev
  6. libqt4-dev
  7. libqt4-opengl (optional)
  8. libtiff4-dev
  9. libpng12-dev
  10. libboost-all-dev
  11. libswscale-dev
  12. libjasper-dev
  13. libxine-dev
  14. libeigen3-dev
  15. libtbb-dev

To install these libraries, you can install by using a command

  • sudo apt-get install libraryname

or using synaptic package manager.

NOTE: I installed another libraries for RTSP streaming for my project which are

  1. libvlccore-dev and libvlc-dev
  2. livemedia-dev and livemedia-utils

7. After running a command “cmake-gui ..”, you will see a window as shown below

You have to click at “configure” button to check the dependency libraries and then you click a “generate” button. The result of configuration on my computer is as follows:

************************************************************************************************

Detected version of GNU GCC: 46 (406)

Extracting svn version, please wait…

SVNVERSION: exported

Performing Test HAVE_CXX_PG_G

Performing Test HAVE_CXX_PG_G – Failed

Performing Test HAVE_C_PG_G

Performing Test HAVE_C_PG_G – Failed

checking for module ‘libdc1394-2’

package ‘libdc1394-2’ not found

checking for module ‘libdc1394’

package ‘libdc1394’ not found

checking for module ‘libxine’

found libxine, version 1.2.0

Looking for linux/videodev.h

Looking for linux/videodev.h – not found

Looking for linux/videodev2.h

Looking for linux/videodev2.h – found

Looking for libavformat/avformat.h

Looking for libavformat/avformat.h – found

Looking for ffmpeg/avformat.h

Looking for ffmpeg/avformat.h – not found

checking for module ‘tbb’

found tbb, version 3.0+r018

General configuration for OpenCV 2.4.2 =====================================

Platform:

Host: Linux 3.2.0-31-generic-pae i686

CMake: 2.8.7

CMake generator: Unix Makefiles

CMake build tool: /usr/bin/make

Configuration: Release

C/C++:

Built as dynamic libs?: YES

C++ Compiler: /usr/bin/c++ (ver 4.6.3)

C++ flags (Release): -W -Wall -Werror=return-type -Werror=address -Werror=sequence-point -Wformat -Werror=format-security -Wmissing-declarations -Wundef -Winit-self -Wpointer-arith -Wshadow -Wsign-promo -fdiagnostics-show-option -pthread -march=i686 -msse -msse2 -mfpmath=sse -O3 -DNDEBUG -DNDEBUG

C++ flags (Debug): -W -Wall -Werror=return-type -Werror=address -Werror=sequence-point -Wformat -Werror=format-security -Wmissing-declarations -Wundef -Winit-self -Wpointer-arith -Wshadow -Wsign-promo -fdiagnostics-show-option -pthread -march=i686 -msse -msse2 -mfpmath=sse -g -O0 -DDEBUG -D_DEBUG -ggdb3

C Compiler: /usr/bin/gcc

C flags (Release): -W -Wall -Werror=return-type -Werror=address -Werror=sequence-point -Wformat -Werror=format-security -Wmissing-declarations -Wmissing-prototypes -Wstrict-prototypes -Wundef -Winit-self -Wpointer-arith -Wshadow -fdiagnostics-show-option -pthread -march=i686 -msse -msse2 -mfpmath=sse -O3 -DNDEBUG -DNDEBUG

C flags (Debug): -W -Wall -Werror=return-type -Werror=address -Werror=sequence-point -Wformat -Werror=format-security -Wmissing-declarations -Wmissing-prototypes -Wstrict-prototypes -Wundef -Winit-self -Wpointer-arith -Wshadow -fdiagnostics-show-option -pthread -march=i686 -msse -msse2 -mfpmath=sse -g -O0 -DDEBUG -D_DEBUG -ggdb3

Linker flags (Release):

Linker flags (Debug):

Precompiled headers: NO

OpenCV modules:

To be built: core imgproc flann highgui features2d calib3d ml video objdetect contrib nonfree gpu legacy photo stitching ts videostab

Disabled: –

Disabled by dependency: –

Unavailable: androidcamera java python world

GUI:

QT 4.x: YES (ver 4.8.1 EDITION = OpenSource)

QT OpenGL support: YES (/usr/lib/i386-linux-gnu/libQtOpenGL.so)

OpenGL support: YES (/usr/lib/i386-linux-gnu/libGLU.so /usr/lib/i386-linux-gnu/libGL.so /usr/lib/i386-linux-gnu/libSM.so /usr/lib/i386-linux-gnu/libICE.so /usr/lib/i386-linux-gnu/libX11.so /usr/lib/i386-linux-gnu/libXext.so)

Media I/O:

ZLib: /usr/lib/i386-linux-gnu/libz.so (ver 1.2.3.4)

JPEG: build (ver 62)

PNG: build (ver 1.5.9)

TIFF: build (ver 42 – 4.0.1)

JPEG 2000: build (ver 1.900.1)

OpenEXR: NO

Video I/O:

DC1394 1.x: NO

DC1394 2.x: NO

FFMPEG: YES

codec: YES (ver 53.35.0)

format: YES (ver 53.21.0)

util: YES (ver 51.22.1)

swscale: YES (ver 2.1.0)

gentoo-style: YES

GStreamer: NO

OpenNI: NO

OpenNI PrimeSensor Modules: NO

PvAPI: NO

UniCap: NO

UniCap ucil: NO

V4L/V4L2: Using libv4l (ver 0.8.6)

XIMEA: NO

Xine: YES (ver 1.2.0)

Other third-party libraries:

Use IPP: NO

Use TBB: YES (ver 4.0 interface 6000)

Use Cuda: NO

Use Eigen: YES (ver 3.0.5)

Python:

Interpreter: /usr/bin/python (ver 2.7.3)

Documentation:

Build Documentation: NO

Sphinx: NO

PdfLaTeX compiler: NO

Tests and samples:

Tests: YES

Performance tests: YES

Examples: YES

Install path: /usr/local

cvconfig.h is in: /home/policeeyes/INSTALLERS/OpenCV-2.4.2/release

—————————————————————–

Configuring done

************************************************************************************************

8. If configuring is done, you can close the CMake-gui window and go back to terminal. In “release” folder, you have to run a command line to compile the source code by running this command

  • make

If OpenCV’s source code and dependency libraries is compiled successfully, you can install the OpenCV-2.4.2 library to Ubuntu system by using a command

  • sudo make install

If you would like to uninstall OpenCV-2.4.2, you have to come to this directory (“/home/myusername/INSTALLERS/OpenCV-2.4.2/release”) and run the following command

  • sudo make uninstall

That’s all. Enjoy OpenCV. 🙂

I tried to install ffmpeg manually using source code checked out from ffmpeg website but , after installation I tried to compile another code which uses this library, there is an error message “common.h:154: error: ‘UINT64_C’ was not declared in this scope”. So, I tried to re-install again by using

CXXFLAGS=-D__STDC_CONSTANT_MACROS ./configure

before make and make install. Unfortunately, I found the same error message when I compiled my code.

I search in google for a while and I found this link.  I followed Eric’s suggestion by adding

#ifdef __cplusplus

#define __STDC_CONSTANT_MACROS

#ifdef _STDINT_H

#undef _STDINT_H

#endif

# include <stdint.h>

#endif

to my common.h file. Then I tried ./configure, make and make install. Once I compiled my code, there is no error message anymore.

Thanks you Eric : )

Credit : P’Phong  @ dsin blogger

Example of my gcc in command line : gcc filename1.cpp filename2.cpp  -o test -I /home/jednipat/opencv/include/opencv/ -lhighgui -L /home/jednipat/opencv/lib/ -I/home/jednipat/levmar-2.4 -L/home/jednipat/levmar-2.4 -lm -llapack  -llevmar -I /home/jednipat/libsvm-2.89/ -L /home/jednipat/libsvm-2.89/

1. Create C++ project in Eclipse Galileo

2. After you finished create C++ project, you have to right click at your project name. Then, you have to select “Properties”.

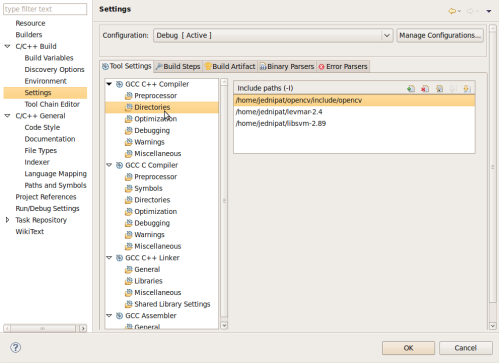
3. In left panel, you have to choose “C/C++ Build”->Settings. Next, in right panel, you have to select tab “Tool Settings”.
To setup Include path (-I), select “GCC C++ Compiler” ->Directories and then you have to add your include path as the following pic.

Include paths(-I)

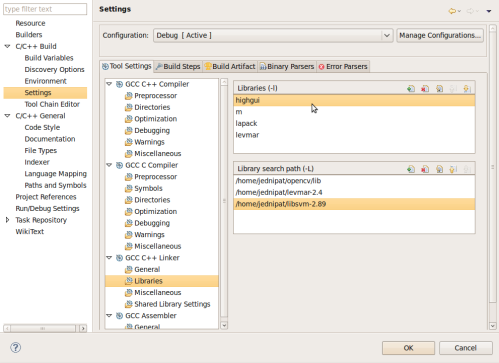
To setup Library paths (-L), you have to select “GCC C++ Linker”->Libraries in same tab Tool Settings. Then add  libraries (-l) and library searc path (-L) as the following pic.

Library paths (-L)

Click “OK” to finish adding library and include paths.

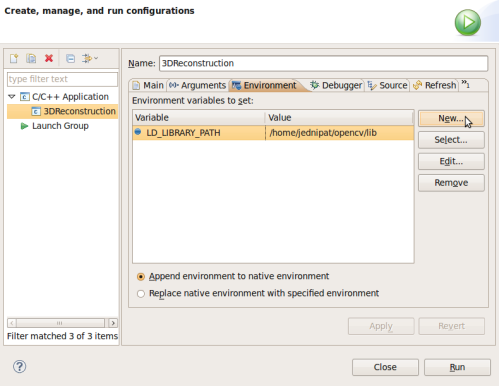
4. In my case, I have to setup environment variable too. To set environment variables, you have to click at “Run” on menu toolbar and then select “Run Configurations…”. Add environment variable like pic below.

Enviroment variable config

Click “Apply” and “Run”.

Posted by: sirivy | October 31, 2009

NOte: Install OpenGL on Ubuntu 9.04

Just note for OpenGL installation on Ubuntu 9.04

You can use Synaptic Package Manager to install package name glutg3-dev .  The list of dependency packages , which are automatically installed, are the following packages:  freeglut3-dev libgl1-mesa-dev libglu1-mesa-dev libxt-dev mesa-common-dev xlibmesa-gldev.

Older Posts »

Categories